Optimize Images from Explorer Context Menu using PNGOUT and Hstart
You can speed up your website and lower your bandwidth costs by making your image files smaller. PNGOUT is the most commonly used image optimization tool. It is a simple command-line utility without any GUI. This tutorial describes how to make it easier to use it from a Windows environment by adding an "Optimize with PNGOUT" option to the Explorer context (right-click) menu.
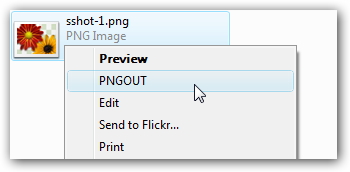
I prefer PNGOUT as it produces smaller image files than other PNG optimizers. If you want, you can replace it with PNGCRUSH or OptiPNG and use them in the same way.
The above menu item calls the following command:
""E:\BIN\pngout.exe" /q "D:\My Pictures\Screenshot.png""
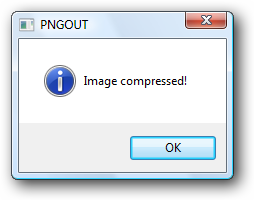
After PNGOUT is executed (note the /WAIT switch), a simple message is displayed:
To enable this Shell command, create a new .REG file with the following content:
[HKEY_CLASSES_ROOT\pngfile\shell\PNGOUT]
[HKEY_CLASSES_ROOT\pngfile\shell\PNGOUT\command]
@="\"E:\\BIN\\hstart.exe\" /NOCONSOLE /WAIT /TITLE=PNGOUT /MSG=\"Image compressed!\" \"\"E:\\BIN\\pngout.exe\" /q \"%1\"\""
A few notes on the REG file:
- The REG files have a special interpretation of backslash characters: you have to use it before double quotes and backslashes if these characters appear in the data value (\\ => \ and \" => ").
- Don't forget to replace "E:\BIN\hstart.exe" and "E:\BIN\pngout.exe" with your own paths.
The sample REG file is included in the Hstart package (see Examples\pngout).
Quick Links
Home • Tutorials • Optimize Images from Explorer Context Menu using PNGOUT and Hstart